RDN Lead Import
The RDN Lead Import module allows users to clean, transform, and import leads into other platforms such as Marketo, Hubspot, Salesforce, etc. You can build reusable templates, apply field-level and global rules, and review or export processed data based on configurations.
Requirements:
Data Validation & Cleansing requirements:
- Make sure your file is in a supported format, either CSV or XLS/ XLSX.
- The system should automatically process and validate input data for conditions such as:
- Mandatory field presence
- Valid email syntax
- Valid country and corresponding state (e.g., U.S. and Canada) matching picklist standards.
- Records that fail validation should be excluded from the import process.
- A rejected output CSV should be generated, containing:
- All rejected records
- A “Rejection Reason” column is appended to explain the cause of failure.
Platform Import Rules Configuration requirements:
Users must be able to configure how cleaned records are handled during import into the platforms. The following import rule categories must be supported:
a) Global Import Rules (Row-level):
i) Operation Type: Select whether to Insert Only, Update Only, or Upsert.
ii) Update if Blank Only: Only update destination fields that are currently blank.
iii) Skip on Validation Conflict: Prevent record updates if validation errors (e.g., invalid email, missing mandatory field) are detected.
b) Field-Level Rules:
- Update Only if the Destination Field is Blank
- Prevent Update with Blank or Specific Values: For example, disallow updating if the incoming value is “NA”.
- Data Concatenation or Transformation:
- Text Fields: Support for Prepend/Append using delimiters, fixed strings, or timestamps
- Numeric Fields: Support for increment or decrement operations.
Clean-Only Mode (Without Export Configurations) requirements:
- RDN must offer a Clean-Only workflow option.
- In this mode, data is validated and cleansed but not exported to the MA platform.
- Cleaned records are returned to the user in a downloadable CSV file.
Field Management & Configuration requirements:
The platform should support:
- Field Definition: Users can define and manage fields used in the lead import process.
- Mandatory Fields List: Ability to create and maintain a set of fields that must be present for any lead import to be valid.
- Picklist Configuration: While defining fields like Country, State (US/Canada), and Member Status, users should be able to specify allowed values.
Important Notes and Best Practices:
1. It is recommended to do a test import of 2-5 leads as you begin to use this tool, so that you can make sure they import correctly before importing a large number of leads.
- It is usually best practice to wait until your leads are uploaded successfully.
PROCESS
1. Lead Import Template Management
Purpose:
Define reusable templates with field mappings, transformation rules, validations, and export configurations.
Steps to create a Template:
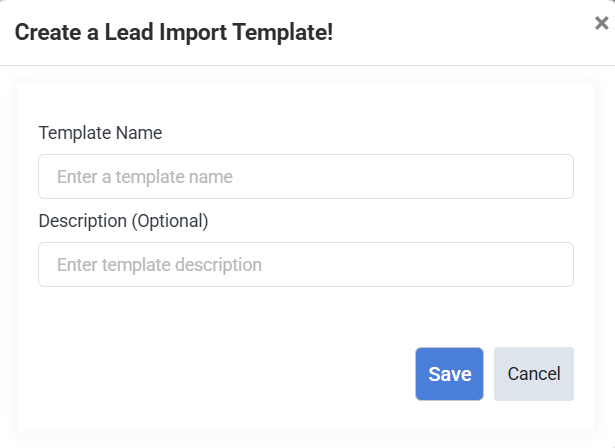
- Navigate to the Lead Import module and choose Lead Import Template
- Click the + icon to add a new template, then enter the template name and description.
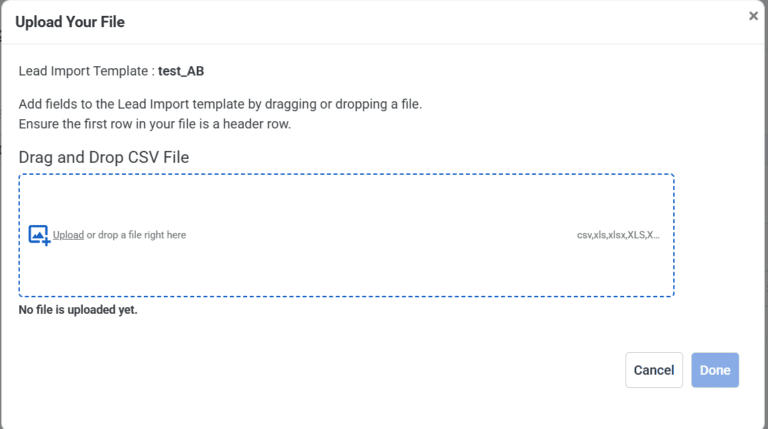
3. After saving details. Initialize fields by clicking on the + icon.
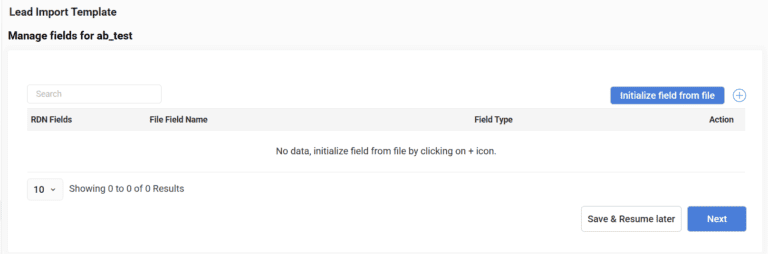
4. Click the Initialize Field from File button to upload your file for automatic field mapping with supported formats: .xls and .csv.
5. After uploading the file, check for duplicates in the list by selecting the field from the dropdown.
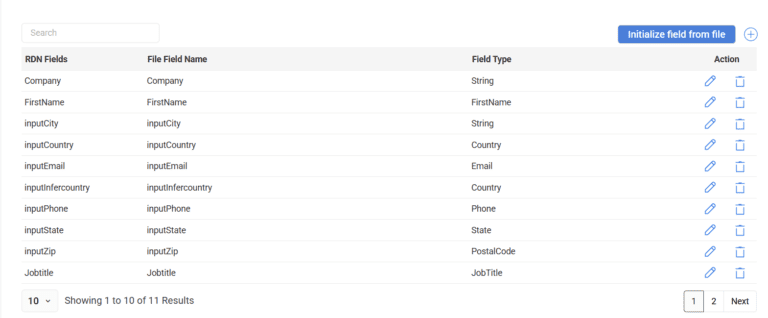
6. Click on the + icon to manage field properties, validations, and cleansing directives.
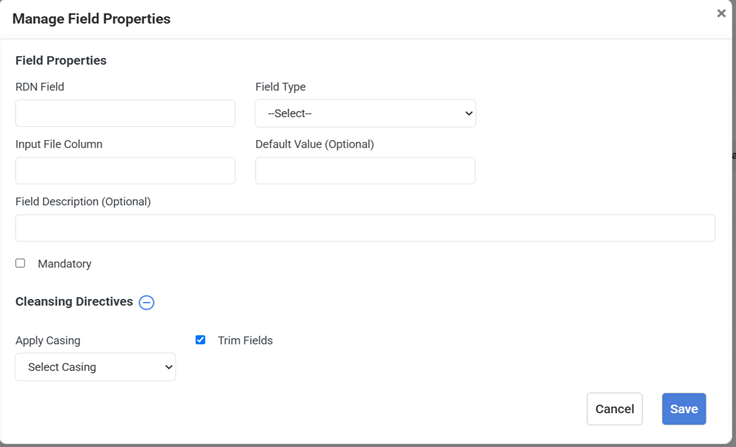
Field Properties
6.1 Field Name: Enter the internal field name used in RDN.
6.2 Field Type- Select the type of data this field represents (e.g., Country, Email, Phone). This helps in validation and processing.
6.3 Alternate Column Names of field in input file- Enter the Input file columns that can represent different variations of the same field during lead import. These values can be listed as comma-separated entries.
6.4 Default Value- Enter a default value to be used when this field is empty in the input file. Leave it blank if not needed.
6.5 Description (Optional)- Enter a brief description of this field’s purpose.
6.6 Mandatory checkbox- Check this box if this field must always have a value. Records missing this field will be rejected.
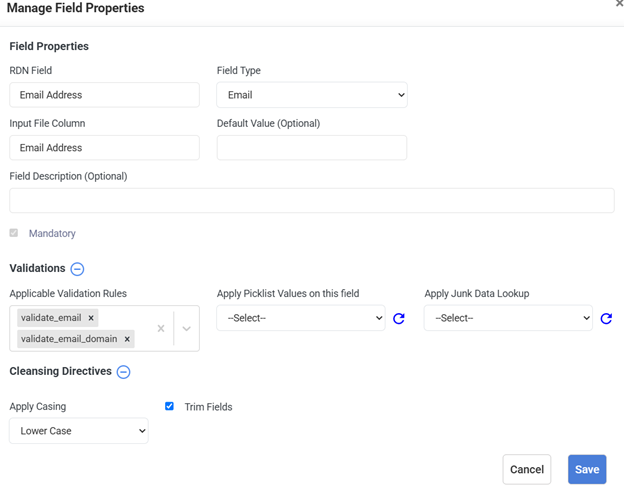
Validations
6.7 Applicable Validation Rules- Select data validation rules to enforce consistency and accuracy in this field. All validation rules will be applicable as per the data type
6.8 Picklist to be applied- Choose a predefined list of valid values for this field. Any value outside this list will be flagged as invalid.
6.9 Junk Lookup- Select a junk lookup list to identify and handle junk values in this field.
Cleansing Directives
6.10 Apply Casing- Select a standard format for text values (UPPERCASE, lowercase, Title Case) to ensure consistency.
6.11 Trim Fields- Select to automatically remove extra spaces at the beginning and end of the field value.
6.12 Fields to check for duplicates in list- Select the field from the dropdown to check for the duplicates in the list.
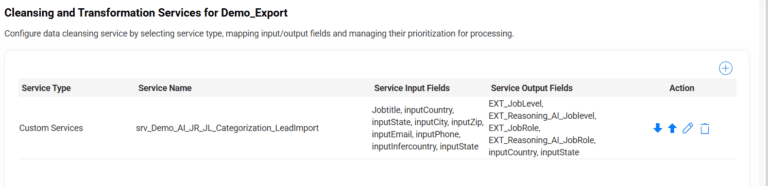
7. Configure data cleansing service by selecting service type, mapping input/output fields, and managing their prioritization for processing.
Click on the ‘+’ icon to apply the cleansing and transformation service, and select the services along with input and destination fields as required.

7.1Service Type– Select the type of service on which transformation or cleansing is to be applied, e.g., categorize a JobTitle into distinct components like JobRole and JobLevel.
7.2 Service Name– Select the service name based on the service type is selected, like JobRole and JobLevel Categorization.
7.3 Input Fields– Select the fields used as input to the service, such as JobTitle.
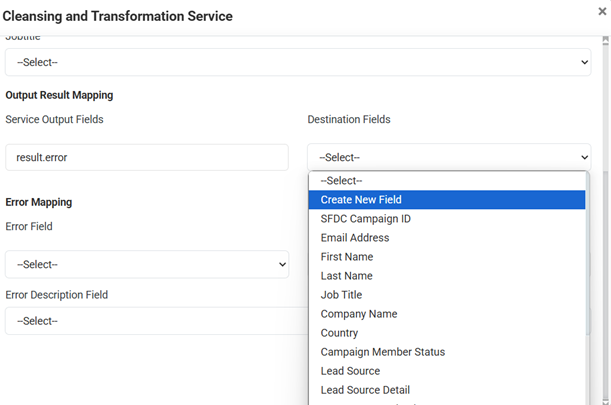
7.4 Output Result Mapping
7.4.1 Service Output Fields- Enter the fields produced after processing, e.g., JobRole and JobLevel.
7.4.2 Destination Fields- Select the destination fields for the service output field selected.
7.5 Error Mapping
7.5.1 Error Field- Select the field from the service output to monitor for error conditions (e.g., ‘result.status’).
7.5.2 Error Value- Set the error value that indicates an error (e.g., ‘invalid’). Records with this value will be flagged or handled accordingly.
7.5.3 Error Description Field- Select the field from the service output that provides the error description (e.g., ‘result.status’). The value from this field will be recorded in the ‘Service Error’ column of the output file.
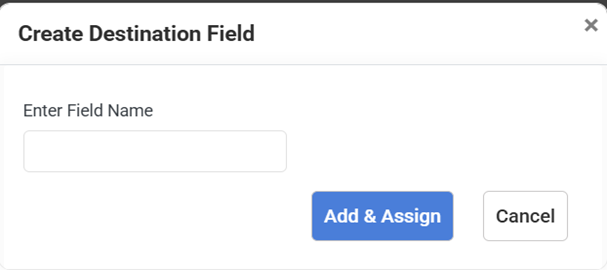
8. To create a destination field if not in the list, select ‘Create New Field’ from the dropdown and enter a field name.
9. Click on the ‘Add & Assign’ button. Click the Save button after all configurations are selected.
10. Rearrange the priorities by clicking the upward and downward arrow buttons, if required.
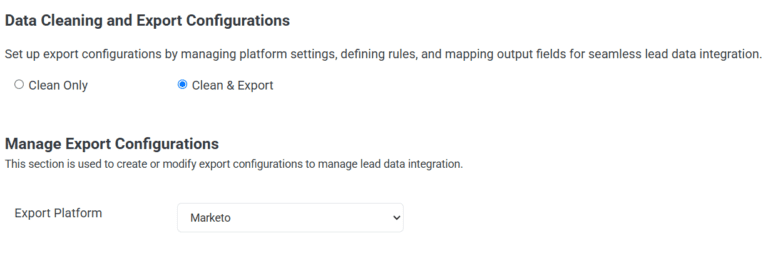
11. For Data Cleaning and Export Configurations, choose the appropriate option: either ‘Clean Only’ or ‘Clean and Export’, based on your requirement.
11.1 Clean Only- By selecting this option, you will receive an email with the cleaned files and all related details once the data cleaning process is complete.
11.2 Clean and Export- By selecting this option, you will be able to create or modify export configurations to manage lead data integration.
11.2.1 Manage Export Configurations– Select the Export Platform from the dropdown list.
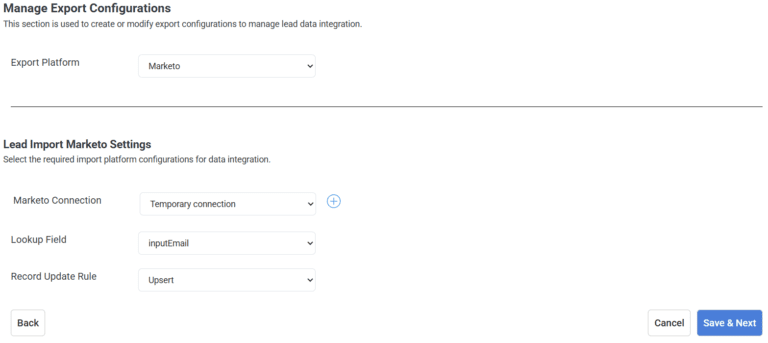
11.2.2 Lead Import Platform Settings– Select the required import platform configurations for data integration.
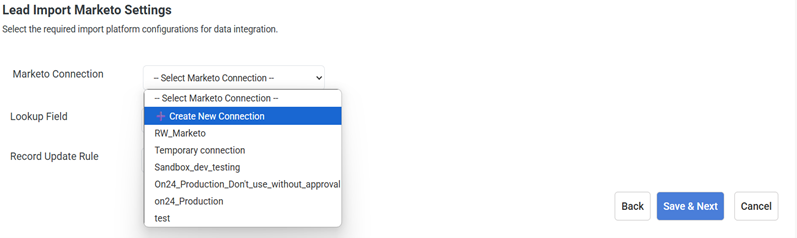
11.2.2.1 Platform Connection- Select the Connection name from the dropdown and click on the ‘Create a new Connection’ option for creating a new connection.
11.2.2.2 Lookup Field- Select the field used to match and reference a specific field value in the Platform selected with an external data source. It helps identify records based on a unique key (such as an email address or lead ID) to update or sync data accurately.
11.2.2.3 Record Update Rule- Choose a rule from the dropdown—Update, Upsert, or Insert. Click on ‘Save & Next’ to save the configuration details.
11.2.3 Platform Settings– Choose the required option; if none are selected, data will be directly pushed to the platform without additional program actions.
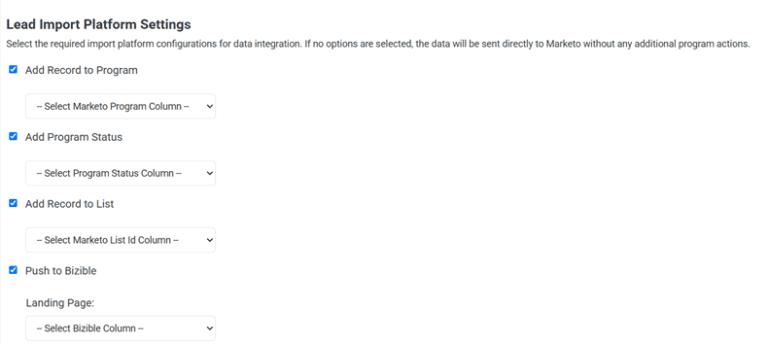
11.2.3.1 Add Record to Program– Enable this option to add imported records to the selected MA program. Select MA Program Column name from the dropdown.
11.2.3.2 Add Program Status– Enable this option to assign a specific program status to imported records within the selected MA program. Select MA Program Status Column from the dropdown.
11.2.3.3 Add Record to List– Enable this option to include imported records in the specified static list. Select MA List ID column from the dropdown.
11.2.3.4 Push to Marketo Measure (Bizible)- Enable this option to push imported records to Bizible for tracking. Select Marketo Measure (Bizible) Landing Page Column from the dropdown.
12. Lead Import Output Mapping- You can map the fields below to match the corresponding template fields in your uploaded file.
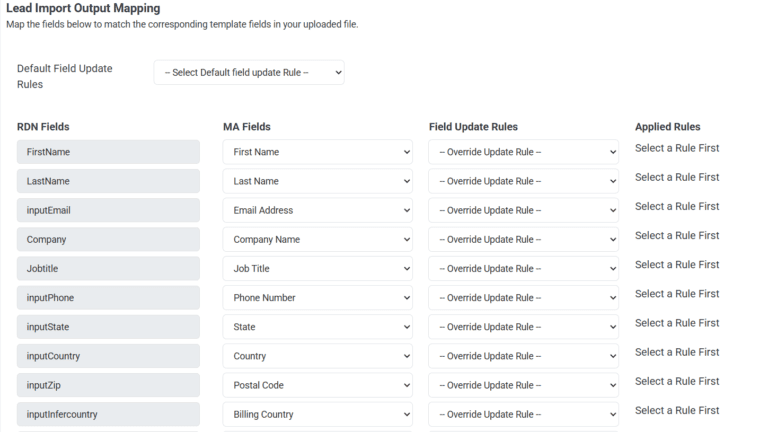
12.1 Default Field Update Rules– Select the default field update rule to be applied for all fields from the options: Update always if new data is not blank , Update always, and Update only if blank. (if required).
12.2 RDN Fields– These are internal fields used in RDN.
12.3 MA Fields– Select the fields of the platform selected from the dropdown list to map the RDN field with the platform field. Select the ‘Ignore Field’ option from the dropdown to skip mapping.
12.4 Field Update Rules– Select the Override Update Rule for each field mapped from the options: Update always, Update Only if Blank, Update always if new data is not blank, and Concatenation.
- Click on the Save & Exit button to save all the configuration settings and mapping.
2. Lead Import Project Management
Purpose:
To run lead imports using a pre-configured template.
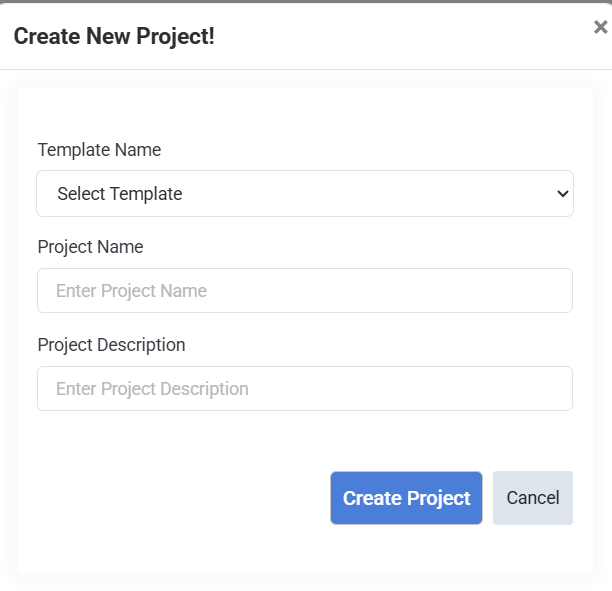
Steps to create a Project:
- In the Lead Import Project module, click the + icon to create a new project.
- Select the Template name from the list.
- Enter the Project name and project description.
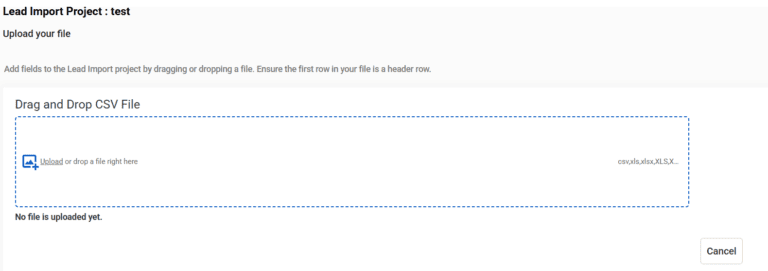
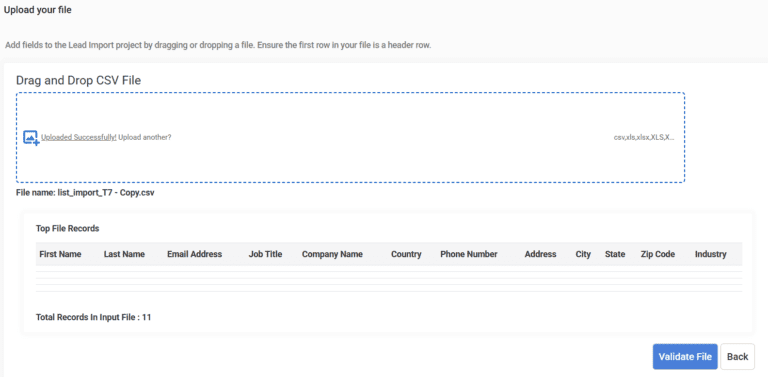
4. After creating the project, upload the file either by dragging or dropping the file.
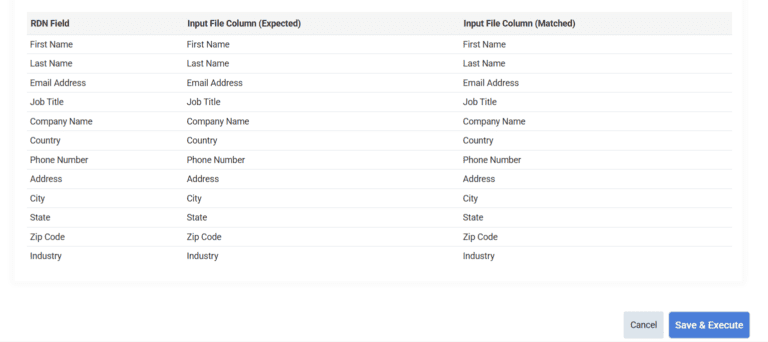
- After uploading the file, validate the file uploaded by clicking the ‘Validate File’ option.
- After file validation, click on Save & Execute.
- The Project will be queued for execution.
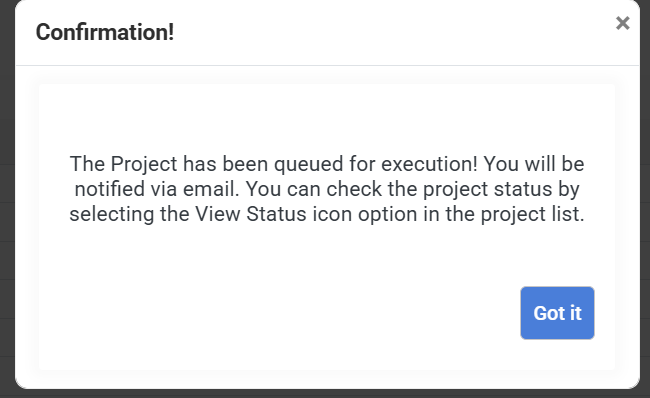
- You will receive an email after the data has been successfully deported. You can view the project status with details. Also, you can check the project status by clicking on the ‘View Status’ option in the project list.
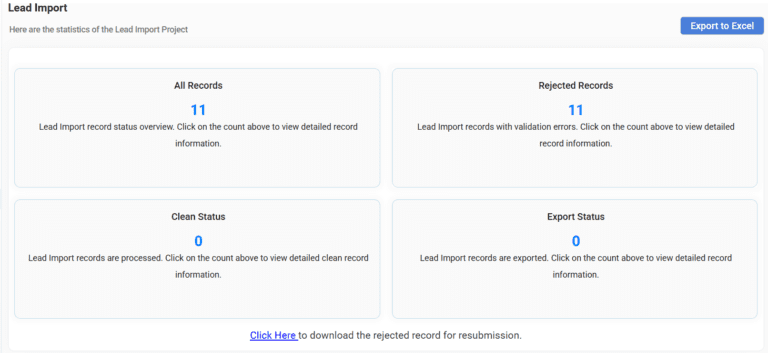
The Statistics Page includes details for ‘All Records’, ‘Rejected Records’, ‘Clean Status’, and ‘Export Status’. You can click on the count for the record details. You can also download the rejected records file. The file with all record details can also be exported in Excel format by clicking on the ‘Export to Excel’ option.